We know many people are just dying to get their hands on Microsoft's latest next-gen console. Informit's own Seth Fogie, however, was dying to get his hands in one. On November 22 at 12:01 AM he headed home with his brand new hardware. But instead of going straight to his couch, he went straight to his toolbench to crack open one of the first Xbox 360s to see what's under the hood. See what's inside and learn how to take it apart in 5 minutes or less with this article and video.
Swoosh. The door at Walmart opens to a somewhat scruffy looking young man in his late teens/early twenties. A set of peering eyes look out from under a dark colored hood and quickly scans the deserted aisles, then looks past the wax machine quietly removing any history of the previous days activities, and over to the electronics section. "It’s gonna be a long day..." sighed the young man checking the clock on the wall that reads 3:30am. But with a quiet determination, he is ready to face the challenge. To him there is no other place he would rather be... assuming the payoff is the latest entertainment system from Microsoft: the Xbox 360. With a bag full of munchies and a bottle of water, he is ready to do what must be done... wait in line.For many hardcore gamers around the US, this story was repeated over and over. Currently, as I write this, there are people lined up outside the local Circuit City, Kmart, Walmart, and most any other store that will carry the Xbox. Unfortunately for them, only the first few in line will get a chance to take home the prized possession. With a major shortage in systems (my Walmart only had 18 total), this console is bound to drive up Ebay prices. Thankfully I was able to get my hands on one. For this I have to thank my brother, father, co-worker, and employer for being flexible and standing in line for me as I took care of business elsewhere. I hereby give them a public and loud THANKS! However, you probably couldn't care less about my experience... so on with the disassembly.
Overview
The Xbox 360 is a powerful entertainment center. It hosts a processor that supports six threads, runs graphics at 500MHz, can handle 9 billion dot product operations per second, hosts three USB ports, has an internal 2.4GHz radio for wireless controllers, and contains a plethora of other features that allow this system to take on the role of household entertainment center. Simply put, this system is supposed to rock for years to come.Well, as it is in my nature, I wanted to see what this compact device hosted under its cover. Of interest, Microsoft gave the public the impression that they were taking extreme measures to keep people out of their hardware. Due to rampant Xbox modifications, some of which allow piracy and various other things Microsoft would like to see go away, they took the design of this system very seriously. However, this type of talk generally has one result: a complete and utter attack to see how the hype holds up. Unfortunately, I have to say that I can take an Xbox apart from top to bottom in 5 minutes flat... and yes, it still works after I put it back together again. I do recognize a difference between this new version and the older one, but I hope MS put more effort into securing the software than they did the hardware!
This guide will show you how to take apart your own Xbox 360 in five minutes, from top to bottom, case to processor. In addition, we also recorded most of the processor specs for your enjoyment and also took apart a wireless controller so you can see how it looks from the inside. Finally, we did a little wireless analysis on the 2.4GHz range to see just how well MS handled their frequency use.
This section will describe how to crack the case of the Xbox and get inside. Use this or check out the 5-minute video.
- First, place the Xbox upside down on your lap, insert your index and middle finger into the memory slot holes, place your thumbs on the bottom of the Xbox (for leverage), and pull the face plate off with a steady force. It should just snap right off.
- Next, break the Microsoft seal (you will void your warranty at this point) as highlighted in Figure 1.
- Now, flip the Xbox on its side and take a close look at the holes located on the top and bottom of each side. If you look closely, you can see that some of the holes are filled in. Why would this be? Well, it is because the filled-in holes are keeping the grey plastic pieces on the top and bottom of the Xbox snuggly in place.
- To remove the top and bottom grey pieces, you will need a small pointed object, as illustrated in Figure 2.
- Locate a grey plastic tab by peering into the holes, then use the probe to carefully push down and lever out the grey top/bottom cover, as in Figure 3. Both pieces have three tabs/clips per side, with a total of six per piece. To remove the top grey piece, you will have to remove the rubber pad. This is the only rubber pad you will have to remove.
- With the grey pieces removed, take a close look at the back side of the Xbox. On the right and left side there are small notches that will require closer inspection. You again will need a small screw driver or narrow probe.
- Using the probe, start on the left side (near power plug socket) and push the catch a bit into the Xbox until it clicks, then use a screw driver to keep the two sides apart (as highlighted in Figure 4. Once the left side is done, start on the right side and do the same thing to the rest of the catches. This is probably the trickiest part of the whole process, so take your time.
- Once they are all separated, the bottom of the Xbox will lift away. At this point slide it around to the front side and undo the four catches, keeping the case together (as highlighted in Figure 1).
- At this point you will need to grab your Torx driver set. I used a T10 and T8 for this part of the disassembly process. Other sites have suggested a range of torx drivers, but this worked for me. You DO NOT NEED a T12.
- Unscrew the six T10 black screws (red circles in Figure 5), then use the T10 to unscrew all the silver screws (blue circles in Figure 5). Finally, unscrew the black screws with your T8 driver (green circles in Figure 5).
If you are just looking to remove the top shelf to gain access to the DVD drive, you only need to remove the silver screws (blue circles in Figure 5). - Carefully flip the Xbox back over.
- Remove the DVD button arm assembly to keep it out of your way. You just need to pry it off the black plastic guide.
- Next, remove the top cover, watching the DVD button latch!
- Disconnect the SATA connector and power connector from the DVD drive and lift it out of the case.
- To remove the white plastic air guide, locate the notch on the top outward side (Figure 6), insert your probe/small screw driver, and leverage the air guide out. It should lift straight out very smoothly.
Next, disconnect the power for the cooling fans. Now, use your probe/screw driver to pry the fan catches out from the metal guard, as illustrated in Figure 7. This will allow you to remove the fan device from the Xbox case.
Next, look at the front of the Xbox on the RF module, and remove the white plastic power button (Figure 8). It is held in place by a clip on the top and bottom. - Now, remove the three screws from the front circuit board (RF module).
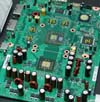
- Once the screws are removed, you will be able to slide the front circuit board off the Xbox with a slight pull. Notice that it is connected on the lower left side. You should now be able to pull the entire circuit board right out of the case with relative ease. Be careful not to touch any exposed circuits.
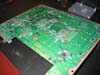
- The next step is to carefully lift the motherboard out of the Xbox case. Figure 9 provides a very detailed look at the motherboard with heat sinks still installed.
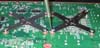
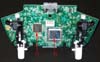
- With the motherboard removed, flip it over and locate the two X connectors on the bottom. These are what hold the heat sinks on the processor. You can remove this; just be careful. It takes a little bit of force, which could destroy your Xbox if not applied properly. However, they do come off as Figure 10 and Figure 11 illustrate.
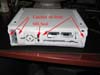 Figure 1 A look under the face plate
 Figure 2 Levering tab on grey panel
 Figure 3 Removing the top/bottom grey pieces
 Figure 4 Taking the back apart on the Xbox 360
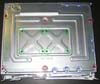 Figure 5 Removing screws from bottom of Xbox 360
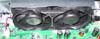
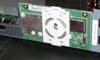 Figure 8 White button on RF module
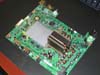
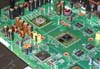
Use Figure 13 to locate the chips you are interested in.
P1
Microsoft Xbox 360
GPU
X02056-00
a-a32/e-c00/b
0536gte
AA Taiwan
N26102.00/3b55v824-a
P2
XCPU - tower
X02046-002
D-B00
053200rfc
C Taiwan
P3
SAMSUNG 534
K4J52324QC-BC12
EFFQ96A2
P4
Xbox360
Ana
X02014-007
A-B03
0S31FK3161.1
AA TAIWAN P5
Xbox 360
XSB
X02047-012
B-G0
0532pqd3847
A Taiwan
At this point you can put everything back together again in pretty much reverse order. The summary of steps is as follows.
- Place heat sinks back on processors.
- Insert circuit board back into case.
- Reinsert the fans, ensuring to plug in the fans' power connection.
- Insert the RF Module/front circuit board.
- Screw in front three black screws.
- Attach white plastic covering over power button on RF module board, paying attention to the direction arrows on the piece.
- Flip Xbox over and insert all small screws. Start in center with small black screws, work out to small silver screws.
- Install white airflow guide.
- Connect and install the DVD drive, making sure support holes line up on circuit board and paying care to not break the DVD drive eject button assembly.
- Place top on Xbox, flip it over, and insert the long black screws.
- Install the DVD drive button assembly.
- Place the bottom on the Xbox and snap it in to place.
- Next put the grey side pieces back where they belong.
- Finally, reattach the front faceplate.
- All done... now test! And yes, mine does work with it back together again (and I took it apart about five times in under and hour)!
Needed: Security Torx T8 driver*
*You don't need a security torx driver. If you are a bit, uh, daring (i.e. destructive), you can break the pin in the center out of the screw and turn it into a regular torx screw. The choice is yours.
The wireless controller is an "optional" must for the Xbox 360. Gone are the days where you have to deal with wires and the limits that come with them. Given the added features of the controller, we decided to purchase one and take it apart for your enjoyment in addition to the core system. - Remove battery case.
- Locate and remove all seven torx screws as per Figure 14.
- Flip the controller over on its top and lift the bottom of the controller from the top. This will keep all the buttons/plastic pieces in place.
Note: The FCC ID is listed at the indicated location. Eventually this ID will be listed at the FCC's website where you will be able to look up manufacturer specs on this controller that are required by the FCC in order to allow production/release. - Snap off the grey plastic piece as indicated on Figure 15.
- Lift the circuit board slowly paying close attention to the battery springs.
- Disconnect the rumble motors (be careful as these connectors are that strong and might pull out).
- Locate the silver processor cover and pry the catches carefully to lift the cover off. Figure 16 provides a shot of what it looks like under that cover (minus a useless support guard we snipped out).
Processor Codes/RF Crystal/FCC ID:
Controller P1: Microsoft X801997003 2S0536RFController P2: MS VM56RU 8019901
RF Crystal: CMT-GJAXN5
FCC ID: C3K-WKS368
Reassembly Instructions:
- Replace silver cover. It easily snaps back into place.
- Reconnect the rumble motors (for fun you could swap them?).
- Flip controller circuit board over with joysticks on top and insert the battery springs into slots while pressing trigger buttons.
- Place rumble motors in place.
- Replace grey plastic separator piece.
- Carefully flip the bottom of the controller over onto top and lay the rumble motors in their respective guides. Everything should fit snugly and smoothly with no force.
- Reinsert screws and test it!
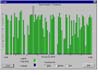
The Xbox 360 wireless controller is a wireless device that operates in the 2.4GHz range. This is interesting for a couple reasons. One, this particular wireless frequency is already very overloaded by phones, Bluetooth, wireless networks, and even your microwave. Two, the Xbox 360 also comes with a wireless network adapter to allow it to connect via a wireless link to your local network and on to the internet. Wouldn't it have been wiser to select something in the 5.8 GHz range, or even the 900 MHz range? Regardless, I decided to fire up my software based 802.11 wireless analyzer and take a sample of the airwaves while playing Need for Speed on my new Xbox. Figure 17 shows the results. The high level is reflective of the close proximity of the analyzer to the Xbox.
Note the rather level spread across the entire 2.4GHz spectrum. This is similar to how Bluetooth operates, which helps it avoid interference problems with other 2.4GHz devices like an 802.11b wireless network. I suspect Microsoft is doing something similar here.
Well, there you have it. It takes about five minutes to take apart an Xbox 360 from case to motherboard. With kind of breakdown speed, I hope the mods start appearing soon! Of course, this assumes anyone will be able to get an Xbox to actually work on it. Regardless, it was fun for me... and my Xbox still works (bonus!). Please be sure to check out the five-minute teardown video to see for yourself how easy it is to expose your own Xbox.
Aucun commentaire:
Enregistrer un commentaire